CSS stands for cascading Style Sheets . CSS is used to define styles for your web pages, including the design, layout and variations in display for different devices and screen sizes. It’s sort of the “brush” in Excel, by which, one can apply styles/formats to other web pages all at once. Speaknkig of CSS, we need to differentiate it from HTML. HTML is meant to describe the content of a web page, like :
This is a heading
It would be a tremendous amount of work if every content is decorated of its style, hence CSS is created solely to define style.
The syntax of CSS is composed of a selector and blocks of declarations:
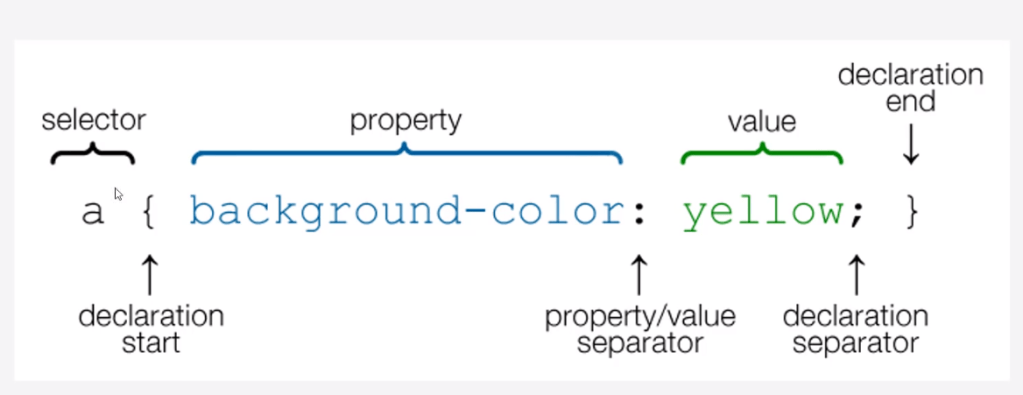
p {
color: red;
/* This is a single-line comment */
text-align: center;
}
Comments are inserted by /* and */.
Simple selectors select elements based on name, id, class; Combinator selectors select elements based on a specific relationship between them; Psuedo-class selectors, Pseudo-elements selectors and Attribute selectors are other kind of selectors. This is better to be illustrated by examples:
.text-center{
text-align: center;
}
.text-left{
text-align: left;
}
.mystyle {
font-size: 11pt;
font-family: Arial;
border-collapse: collapse;
border: 1px solid silver;
}
.mystyle td, th {
padding: 5px;
}
.mystyle tr:nth-child(even) {
background: #E0E0E0;
}
.mystyle tr:hover {
background: silver;
cursor: pointer;
}
Now the tricky part is how to insert CSS into your file? There are three ways: external, internal and inline CSS.
External styles are defined within the element, inside the section of an HTML page:
Internal CSS is defined directly within HTML:
body {
background-color: linen;
}
h1 {
color: maroon;
margin-left: 40px;
}
Inline style may be used to apply a unique style for a single element. So no need to insert into the head part, just type the below. It is not recommended because it defies the very reason why people use CSS for efficiency.
This is a heading
What style will be used when there is more than one style specified for an HTML element? All the styles in a page will “cascade” into a new “virtual” style sheet by the following rules, where number one has the highest priority:
- Inline style (inside an HTML element)
- External and internal style sheets (in the head section)
- Browser default
So, an inline style has the highest priority, and will override external and internal styles and browser defaults.
Other knowledge points are to learn what padding, margin, border, border-bottom(thickness of the bottom line in a table) means. And usually to define width and height is to use
“This element has a height of 200 pixels and a width of 50% “
div {
max-width: 500px;
height: 100px;
background-color: powderblue;
}
There are plenty ways to manipulate text editing, maybe more than that is provided by Microsoft, reference to this link.
Making Link button is essential in creating my web apps, so CSS also has link styling options. For example, (this needs a further look)
Next the most important feature for me is the Table formatting. The details are available via this link.
Lastly, also foremost importantly, is to design button for inputting values. that’s CSS Forms. for example
input[type=text] {
width: 100%;
padding: 12px 20px;
margin: 8px 0;
box-sizing: border-box;
}
{% csrf_token %}
{% if error_dict %}
{{error_dict.file_error}}
{% endif %}
{% if error_dict %}
{{error_dict.threshold_error}}
{% endif %}
It’s worth pointing out difference between class and id in html and css, think of id as elements which is to put special place such as main nav bar
if you use class=”box-1″, may use this somewhere else. One perfers to use class if have to, note that bootstrap use all classes.
It’s worth noting that to grasp CSS and HTML, one certainly need to create toy files to play around, however, the path setting is bit of tricky. On one hand, Django framework has urls.py specify the path setting, on the other hand, in local drive, it’s essential to not mess up, stackoverflow has a very good answer on this confusion:

This folder structure knowledge is particularly important in linking html css and image or other file path. For example, when I tried to set a jpg link in html lay out, using local drive c:\ etc won’t work, it has to be based on the html folder, which is under root of vscode, which is AMD, then ./env_PA/GNT/, I can paste the image under GNT directly, or subfolder, but it seems i can’t paste the jpg above, out of scope of the html location.
		<!-- Image -->
            <!-- <img href="gsm-197-tsunami_by_Hosusai_19th_century.jpg" alt="my pic" width="420" height="420"> -->
			<img src="gsm-197-tsunami_by_Hosusai_19th_century.jpg" alt="my pic" width="420" height="420">
subfolder below where html file located also works, set as follows, note the . to indicate root/html folder is a must.
<img src=”./staticfiles/gsm-197-tsunami_by_Hosusai_19th_century.jpg” alt=”my pic” width=”420″ height=”420″>
Also windows convention is backward slash, while all other system unix, linux adopt forward slash.
Next hurdle I come across in application is the toggling between html and css on understanding of div in html and class in dot format in css.
in html, a block of text/body can be wrapped into a div, give that a class = “box-1”>, then set .box-1 in css. Note id as element not to put anywhere, in nav bar you give an id; class such as box-1 here can be used in anywhere
target a class we use .box-1 {
background-color: #333 black color}
margin:0
color:white;
Another commonly used class is .container for a chunk of words
.contanier {
width: 960px;
margin:auto
width: 80%
Now I’d like to build my own customized bootsrap backed css, together with notes on how to apply in HTML:
{% load static %}
<!DOCTYPE html>

<html>
<head>
    <meta charset="utf-8" />
    <title>SPAR</title>
    <script>document.write('<base href="' + document.location + '" />');</script>
    <!-- Latest compiled and minified CSS -->
    <link rel="stylesheet" href="https://maxcdn.bootstrapcdn.com/bootstrap/4.3.1/css/bootstrap.min.css">
    <!-- jQuery library -->
    <script src="https://ajax.googleapis.com/ajax/libs/jquery/3.3.1/jquery.min.js"></script>
    <!-- Popper JS -->
    <script src="https://cdnjs.cloudflare.com/ajax/libs/popper.js/1.14.7/umd/popper.min.js"></script>
    <!-- Latest compiled JavaScript -->
    <script src="https://maxcdn.bootstrapcdn.com/bootstrap/4.3.1/js/bootstrap.min.js"></script>
    <link href="https://maxcdn.bootstrapcdn.com/font-awesome/4.7.0/css/font-awesome.min.css" rel="stylesheet">
    <link rel="stylesheet" href="{% static 'css/style.css' %}" type="text/css" />

</head>
<body>
        <div>
            <nav class="navbar navbar-dark bg-primary text-white justify-content-between">
                <a class="navbar-brand">A Dynamic Interface of SPAR</a>
            </nav>
        </div>

        </div>
        <div class="m-20">
            <div class="row">
                <div class="col-md-12">
                    <div class="block-container">
                        <div class="block-header">
                            <form method="POST" enctype="multipart/form-data">
                                {% csrf_token %}
                                <div class="form-row">
                                    <div class="form-group col-md-4">
                                        <label for="test_file" class="mr-sm-2">Enter Test File<span class="text-red">*</span></label>
                                        <input type="text" class="form-control mb-2 mr-sm-2" id="test" name="test" style="height: 44px;">
                                        {% if error_dict %}
                                        <span class="text-red">{{error_dict.error_message}}</span>
                                        {% endif %}

                                    </div>
                                    <div class="form-group col-md-4">
                                        <label for="benchmark" class="mr-sm-2">Enter Benchmark<span class="text-red">*</span></label>
                                        <input type="text" class="form-control mb-2 mr-sm-2" id="bm" name="bm" style="height: 44px;">
                                        {% if error_dict %}
                                        <span class="text-red">{{error_dict.error_message}}</span>
                                        {% endif %}
                                    </div>
                                    <div class="form-group col-md-4">
                                        <label for="frequency" class="mr-sm-2">Enter Frequency<span class="text-red">*</span></label>
                                        <input type="text" class="form-control mb-2 mr-sm-2" id="freq" name="freq" style="height: 44px;">
                                        {% if error_dict %}
                                        <span class="text-red">{{error_dict.error_message}}</span>
                                        {% endif %}
                                    </div>
                                    <div class="form-group col-md-4">
                                        <label for="startdate" class="mr-sm-2">Enter Startdate<span class="text-red">*</span></label>
                                        <input type="text" class="form-control mb-2 mr-sm-2" id="sd" name="sd" style="height: 44px;">
                                        {% if error_dict %}
                                        <span class="text-red">{{error_dict.error_message}}</span>
                                        {% endif %}
                                    </div>
                                    <div class="form-group col-md-4">
                                        <label for="enddate" class="mr-sm-2">Enter Enddate<span class="text-red">*</span></label>
                                        <input type="text" class="form-control mb-2 mr-sm-2" id="ed" name="ed" style="height: 44px;">
                                        {% if error_dict %}
                                        <span class="text-red">{{error_dict.error_message}}</span>
                                        {% endif %}
                                    </div>
                                    <div class="form-group col-md-4">
                                        <button type="submit" class="btn btn-success m-t-35">Submit</button>
                                    </div>
                            </form>

                        </div>
                </div>
            </div>
        </div>
            <!--START : Version alternative-->
    <div class="block-header">
        <span style="font-weight:bold;">

            <a href="/{{file_path}}"><button class="btn btn-warning">Download</button></a>
        </span>
    </div>


<table>
    <tbody style="height:8px">
        {{ dt_html | safe }}
    </tbody>
</table>
<div>
</div>

<h2>Performance - Total Return</h2>
<!--  <img src="{% static 'files/jpg.jpg' %}" alt="test image" >-->
  <img src="/{{jpg_path}}" alt="Trulli" width=1500" height="900">
<!-- <img src="/static/files/spar_return_image_test.jpg" alt="My image"> -->
<!-- <img src=" {{njpg}} " alt="My image"> -->
<!-- <img src="/performance/static/files/spar_return_image_test.jpg" alt="My image"> -->
</body>

</html>
To summarize, there are bunch of classes:
class = “navbar navbar-dark bg-primary text-white justify-content-between”
class = “navbar-brand”
class = “m-20”
class = “row”
class = “block-container”
class = “block-header”
class = “form-row”
class = “form-group col-md-4”
class = “text-red”
class = “btn btn-warning”
Referencing them in the CSS or hidden/implicit bootstrap class are:
class = “navbar navbar-expand-sm bg-light”, class=”navbar navbar-expand-sm bg-light justify-content-center”>,
checkout w3school bootstrap to choose different style.
.block-container { border: 1px solid #618FD6; padding: 0 15px; margin-bottom: 20px; } .block-header { padding: 15px 0; font-size: 16px; color: #444444; }

the color of boarder line, padding margin is as outlined in the css class of block-container and block-header.
class m-20 is in the css file, it’s a one-off setting to make format pretty:
m-20{ margin: 20px; }
To apply customized table style with features such as “hovering”, in css file, I also added class .mystyle, then with this one line to implement:
tb.iloc[0:5, 0:].to_html(index=True,classes=”mystyle”)
            .mystyle {
                font-size: 11pt;
                font-family: Arial;
                border-collapse: collapse;
                border: 1px solid silver;
            }

            .mystyle td, th {
                padding: 5px;
            }

            .mystyle tr:nth-child(even) {
                background: #E0E0E0;
            }

            .mystyle tr:hover {
                background: silver;
                cursor: pointer;
            }
